メニューから[新規]-[プロジェクト]を選択する。
SpringBootの中にある「Springスタータープロジェクト」を選択する。
Webの中にある「Spring Web」を選択して「完了」する。
プロジェクト名「demo」を右クリックして[Maven]-[プロジェクトの更新]を選択する。
「OK」をクリックすると画面下のステータスバーに何か処理が動いている表示になる。
プロジェクトの更新が終わったらプロジェクト名「demo」を右クリックして[実行]-[maven install]を選択する。
コンソールにいろいろと表示され、最後のほうに「BUILD SUCCESS」と表示されればOK!
なぜか、SpringBootアプリケーションとして起動しても動作しないので、設定を変更して、別に準備したTomcat上で動作させてみる。
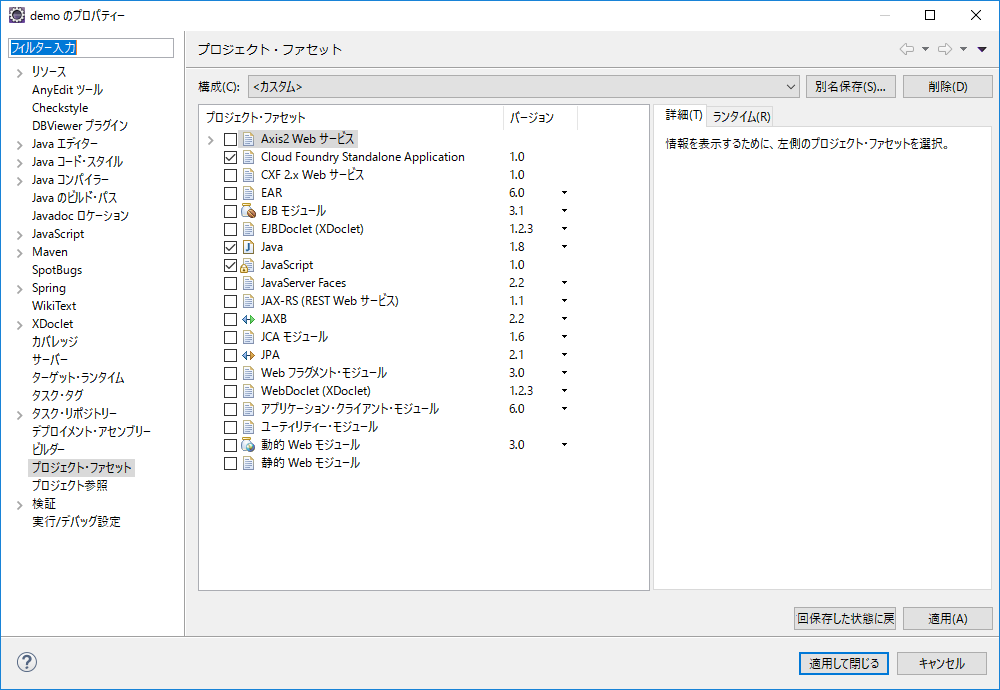
demo プロジェクトを右クリックして「プロパティ」を選択し、左側から「プロジェクト・ファセット」を選択する。
以下の図のように、チェックした状態で「適用して閉じる」をクリックする。
demo を右クリックして「実行」‐「SpringBootアプリケーション」を選択するとWebアプリケーションが起動する。
コンソールに「 Started DemoApplication in 2.426 seconds (JVM running for 2.933)」のような表示が出ていればOK。
画面上に「プロジェクト・エクスプローラー」が表示されていない場合は、メニューバーから「ウィンドウ」‐「パースペクティブ」‐「パースペクティブを開く」‐「その他」を選択する。
パースペクティブの一覧が表示されるので、「JavaEE」を選択して「開く」をクリックする。
コントローラの作成
コントローラクラスを作成する。
プロジェクト・エクスプローラーで「Javaリソース」‐「src/main/java」-「com.example.demo」を右クリックし「新規」‐「クラス」を選択する。
名前に「HelloController」と入力し「完了」をクリック。
http://localhost:8080/hello にアクセスすると、画面上に「Hello World!」と表示される。
静的HTMLファイルの表示
src/main/resource を右クリックして「新規」‐「フォルダ」を選択する。
「public」フォルダを作成する。
public を右クリックし「新規」‐「その他」を選択する。
「HTMLファイル」を選択して index.html を作成する。
<!DOCTYPE html>
<html>
<head>
<meta charset="UTF-8">
<title>Hello index.html</title>
</head>
<style>
h1 {
  color: red;
}
div.border {
	border: solid 2px blue;
	border-radius: 5px;
	padding: 5px;
}
</style>
<body>


<h1>Hello</h1>
<p>Hello index.html</p>

<div class="border">
div タグにボーダーを追加する例
</div>

<hr />

<p>src/main/resources/public/index.html</p>

</body>
</html>
http://localhost:8080/ にアクセスすると、public/index.html の内容が表示される。
コントローラとビューの利用
今回はライブラリの不足のために動作しないが、SpringBootの場合、ControllerとViewを組み合わせてWebサイトを作成する。
src/main/java の com.example.demo を右クリックし「新規」‐「クラス」を選択する。
/test というURLにアクセスが来たら、templates/index.html を表示する仕組みを作成する。
IndexController.java
package com.example.demo;

import org.springframework.stereotype.Controller;
import org.springframework.web.bind.annotation.RequestMapping;

@Controller
public class IndexConroller {
	@RequestMapping("/test")
	public String index() {
		return "index";
	}
}
src/main/resources の temlates を右クリックし「新規」‐「その他」を選択する。
「HTMLファイル」を選択し、 index.html を作成する。
<!DOCTYPE html>
<html>
<head>
<meta charset="UTF-8">
<title>Controller test</title>
</head>
<body>
Hello src/main/resources/templates/index.html
</body>
</html>
サーバーにデータを問い合わせる
Beer クラスを作成する。
Beer.java
package com.example.demo;

public class Beer {
	private String name;
	private int price;
	public Beer(String name, int price) {
		this.name = name;
		this.price = price;
	}
	public String getName() {
		return name;
	}
	public void setName(String name) {
		this.name = name;
	}
	public int getPrice() {
		return price;
	}
	public void setPrice(int price) {
		this.price = price;
	}

}
ビールのリストを返すコントローラを作成する。
package com.example.demo;

import java.util.ArrayList;
import java.util.List;

import org.springframework.web.bind.annotation.RequestMapping;
import org.springframework.web.bind.annotation.RestController;

@RestController
public class BeerController {
	@RequestMapping("/beer")
	public List<Beer> beers() {
		List<Beer> list = new ArrayList<>();
		list.add(new Beer("一番搾り", 200));
		list.add(new Beer("プレミアムモルツ", 240));
		list.add(new Beer("ギネス", 300));
		return list;
	}
}
ブラウザでJSONデータを受け取れるようになったので、AJAXを使ってデータを受信し、画面を更新するようにしてみる。
<!DOCTYPE html>
<html>
<head>
<meta charset="UTF-8">
<title>Hello index.html</title>
<script src="jquery-1.12.4.min.js"></script>
<script type="text/javascript">
$.ajax({
	url: '/beer',
	dataType: 'json',
	success: function(data) {
		result(data);
	}
});

function result(data) {
	var div = $('#beers');
	$.each(data, function(i) {
		console.log(data[i]);
		var beer = $('<div>');
		var name = $('<span>').text(data[i].name);
		var price = $('<span>').text(data[i].price + '円');
		beer.append(name);
		beer.append(price);
		div.append(beer);
	});
}
</script>
</head>
<style>
h1 {
  color: red;
}
div.border {
	border: solid 2px blue;
	border-radius: 5px;
	padding: 5px;
}
</style>
<body>


<h1>Hello</h1>
<p>Hello index.html</p>

<div class="border">
div タグにボーダーを追加する例
</div>

<div id="beers"></div>

<hr />

<p>src/main/resources/public/index.html</p>

</body>
</html>